Saturday, March 28, 2009

Teacher Gifts!

"Teacher Gifts!" from Testosterone Times Three.

How cute are these!?!?! She used broken (she suggests using a knife) crayons to create the initial of the teacher's last name. Could be done with colored pencils, or regular pencils as well.

Babylegs

"Babylegs" from Nannygoat.

I love the look of "Baby Legs." When I have I child some day, I promise that he or she will live in onesies and babylegs. I mean, look at Jordan's little guy, Moses. But they're kind of expensive to have a whole closet full of. So I'm really loving this tutorial on how to make your own.

Instructions:
"All you need is, KNEE HIGH SOCKS, SCISSORS, SEWING MACHINE and THREAD.
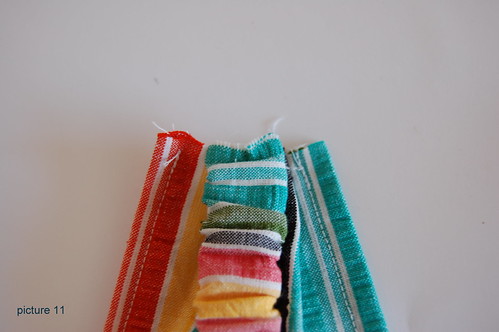
Make the above 3 cuts in your socks. 
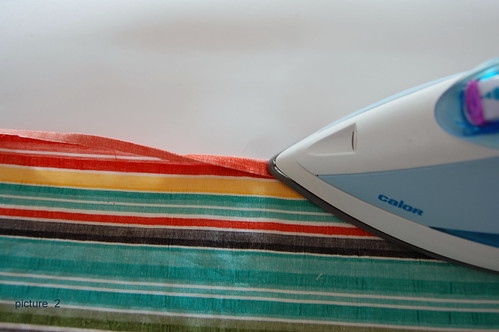
Now make your last cut as shown above. Cut more or less off the bottom to make a bigger or smaller cuff (for older or younger bebes). You will now take the larger piece and flip it so the right sides are together. Take that same piece (soon to be your cuff) and close the open edge with a zig zag stitch. Your cuff is well on it's way. Now turn the long part (leg) inside out.
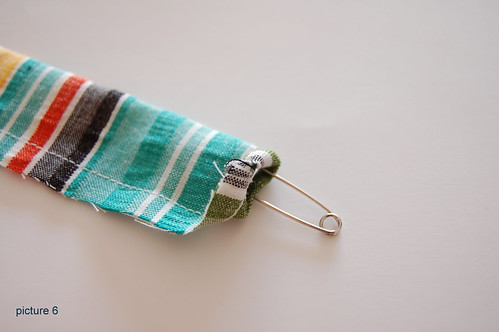
Start to turn your cuff right side out... but not all the way.
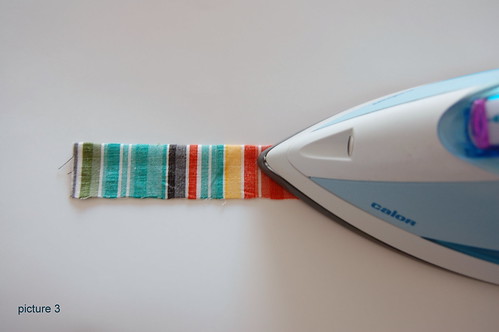
Just till it is exactly in half. (folded edge towards the leg, unfinished edge toward the toe).
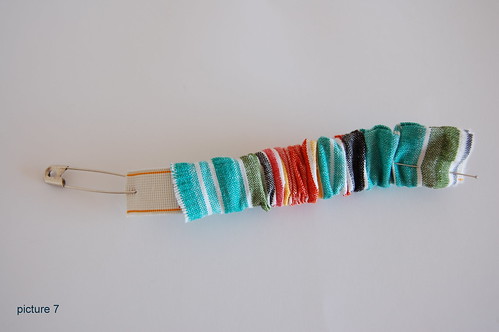
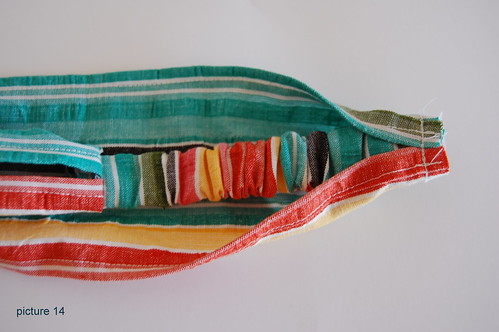
Simply slide the leg up so it is even with the cuff.
Even closer, till it is inside the leg.
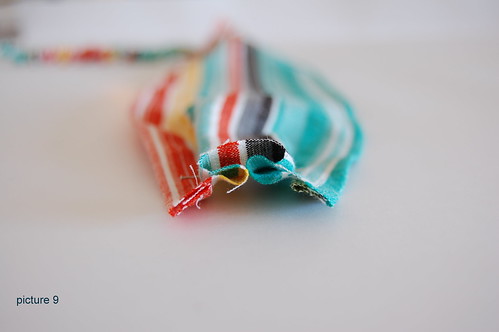
In a little more, so all the unfinished edges are together.
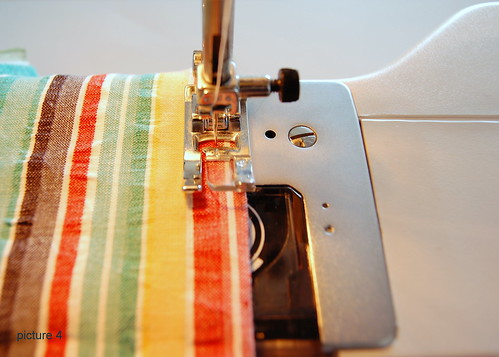
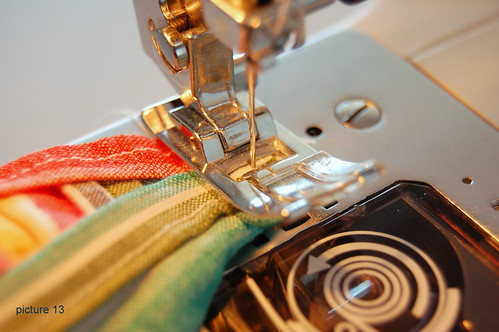
Move that same piece to the sewing machine, place your foot on three layers of fabric (2 cuff, 1 leg) and sew all the way around (line up the right edge of your presser foot with rough edges).
Since the cuff is a little smaller than the leg, you can pull on the cuff to stretch it a bit while you sew. (Don't stretch the bottom layer.)
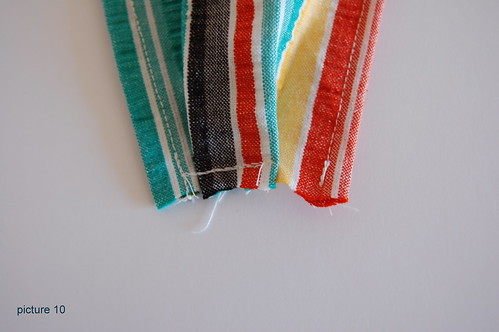
Once you have made it all the way around, go around one more time, this time sew right on the rough edge.
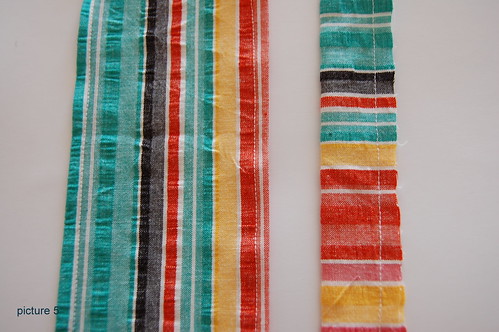
Flip out that cuff. Now turn it right side out. Toss those little scraps and Voila!!!

Friday, March 27, 2009

Chore Chart

"Chore Chart" from Martha Stewart.

"Design colored rectangles with the names of chores typed inside them. If you like, color-code magnets according to level of difficulty or frequency (every day, once a week, and so on). Kids' photos can be scanned in or downloaded from a digital camera. Assemble chore names and photos on one computer page, then print onto a magnet sheet; cut out. To make the chart, design a column for each child, with areas labeled "chores to do" and "chores completed." Print onto a magnetic sheet, and post it on the refrigerator, adding kids' photos and chore magnets."

1st party banners

"1st party" from Party Perfect.
Instructions found here.

Love the banner idea, using photos taken throughout the year. It's almost overwhelming, but yet with the consistency, it's actually really awesome!

I guess it would show what photo-nerds we are. Could also use for an older person's party, too--through the years. Also seen... photos of mom and dad as babies for a baby shower.

red, white, and blue birthdays

"baby j's 3rd birthday bash" and "red+white+blue" from shimandsons.
Love these red, white and blue birthday parties. The pinwheels, mobiles, and pennant are so inspiring for a simple party.

Could be cute for 4th of July as well!!

Decorate a Staircase

"Decorate a Staircase" from the haystack needle.
This photo (my favorite) is found at idahostudio's flickr page.

My stairs right now are carpeted, but someday, someday, I'll have wooden stairs.

Friday, March 20, 2009

Headband

"Headband" from Between the Lines.

This is what you'll need:

pic1

- two rectangular pieces of fabric: a big one of 40cm x 12cm and a smaller one of 20cm x 6cm (seams included) - Note: you might want to change the dimensions depending on the size of the head, the type of fabric you chose and the elasticity of the elastic. The sizes given here, worked fine for my 5 and 8 year olds. Also, you might want to try to make a wider one. I've seen them in a wider version, which is especially pretty with long or very curly hair.
Note: my oldest one tried on this new headband when she got home from school and found it a little tight. Although I used the same dimensions on all of the headbands, I used a different brand of elastic. To avoid disappointment, better cut the elastic a little longer - it's easier to make the headband smaller than the other way around...
- about 12cm of wide elastic
- matching sewing thread
- safety pin and needle pins
- iron
- sewing machine

Step one: Lengthwise, iron in the seams of the bigger piece, folding over the fabric twice (about 7mm). Next, with the right sides to each other fold the smaller piece in two, lengthwise and iron flat. (pic. 2 and 3)

pic2

pic3

Step 2: Sew the seams about 5mm from the edge. (pic. 4 and 5)

pic4

pic5

Step 3: Turn inside out the smaller piece, using the safety pin (pic. 6). Slide in the elastic, also using the safety pin (pic.7). Secure with pins on both sides and then sew to secure (pic.8).

pic6

pic7

pic8

Step 4: Fold over the bigger piece as shown in pic. 9, such that its width becomes a little more than twice the with of the smaller piece with elastic. Secure by sewing a couple of stitches near the edge (pic.10).

pic9

pic10

Step 5: On one end, put the elastic part on top of the bigger piece, the bigger piece being right side up (pic. 11). Squeeze the elastic part in between by folding over fabric from the sides and secure with pins (pic. 12). Next, sew it closed (pic. 13). Repeat at the other end (pic. 14) - before doing so check one more time for the size!

pic11

pic12

pic13

pic14

A Little Big Project

"A Little Big Project" from Elise Baha :: enJoy it.

My grandmother taught me how to cross-stitch when I was little. I think it's a pretty cool craft, but few applications are very modern and appropriate for my style. That is, until I saw Elise's novel approach. She's using them for table numbers at her wedding. I love the iconic typography. What could I use them for? How cute would it be to do the alphabet in a nursery? Or as house numbers (inside, hmmm...)? Where else?

Belly Pictures


"Belly Pictures" from Pacing the Panic Room.

I've told Rob that I have no interest in having professional maternity photos taken (if and when I'm ever pregnant!). Because I simply can't imagine how you use those photos--do you really want them on your wall? However, these are pretty cool, and I can totally see a Blurb book like this. And, paired with "letters" to the baby, what a special memento it becomes.

Thursday, March 19, 2009

Last Minute Christmas Tags

"Last Minute Christmas Tags" from inchmark.
What a cute idea for Christmas tags. I love personalized tags--I told my husband this year that if you make the wrapping look cute, then you can get away with giving a "cheaper" gift.

PS: I, of all people, know that it's not about how much the gift costs, but I'm afraid not all of our gift recipients are of like mind!

Baby #4 Shower


"Baby #4" from Inchmark.

Another cute, but simple baby shower idea. Especially wonderful if you don't know the baby's gender. Wish I had more friends. Maybe my sister will have lots of babies!! :)

Monday, March 16, 2009

First Words Book

"Weekend Project #2" from Party Perfect.

After Sara bought a "First Words" book for her son, she found that the items didn't look like the items she had around the house. So she decided to make her own.

How awesome is that?!?! I love an excuse to make a Blurb book--and this actually makes sense. How adult of us to assume that a baby understands her pink and purple shoes are shoes just like the sneakers in the book!

She also has ideas for a book of relatives as well. How fun!

Friday, March 13, 2009

Hanging Book Display

"How To: Make a Hanging Book Display" found at OhDeeDoh from Megan.

"

Tools:
-A 47-inch by 40-inch piece of fabric (I used Amy Butler’s “daisy bouquet” ) -Two double curtain rod brackets. I bought mine for about $5 each at Lowes, but here are some I found online -Two, 4-foot long wooden dowels or curtain rods that fit into the brackets. Drill and drill bits -Level -Stud finder -Pencil -General sewing supplies, like a sewing machine, thread and scissors -Optional: paint, paintbrush and sandpaper (options 1 and 2) and wooden balls or other end caps for the dowels (option 3).

Steps:
I made this hanging book display to help solve that problem. It’s modeled after school-grade book display cases that show the fronts of books, and hopefully will make choosing a bedtime book easier (and faster!).

  1. Fold the fabric lengthwise, with right sides facing, so you are working with a double thickness rectangle that is 47 inches by 20 inches.
  2. Using a 1/2-inch seam, sew the fabric together around one of the short sides, the long side and about half-way down the other short side.
  3. Turn the fabric right side out through the opening, poking out the corners with a turning tool (a pencil will do—just don’t poke all the way through).
  4. Sew the opening shut by folding the raw edges toward each other, then top stitching down that short end of the rectangle.
  5. Now you’ll need to sew casings for the dowels on the two long ends of the rectangle. You can either do this by measuring the circumference of the dowels and folding that amount of fabric, plus a bit, over or actually laying down the dowel, wrapping the fabric over it, and pinning it along the side of the dowel until you’ve created a tube that holds it.
  6. Remove the dowels (if you chose the latter route) and sew the casings.
  7. It’s time to hang the hardware on the wall. Locate two studs four feet apart on the wall where you want to hang the book holder. (Note: my studs were four feet apart. It’s not a bad idea to find your studs before you start the project and make a book hanger that aligns with your studs. Or just use those little plastic things they sell to hold screws in the wall).
  8. Test out the locations with the dowels. You don’t want the curtain rod brackets to be so far apart that the dowels don’t reach, but you don’t want them so close that the fabric gets bunchy. Mark the stud locations lightly with a pencil. Using a level, mark the points where you want the brackets.
  9. Pre-drill holes for the screws. Screw the brackets onto the wall. Hang the fabric on the dowels, then insert the dowels into the brackets. The brackets should come with tiny screws that tighten onto the dowels, holding them in place. Load with books. If you screwed the hardware into studs your book holder should be able to handle a good amount of weight, but don’t go too crazy.
  • Option 1: Before getting started, you could paint the ends of your dowels a color that matches the décor of the room or the fabric.
  • Option 2: If you don’t like the color of the brackets, you could paint that, too, with a paint that adheres to metal. Sand the metal first so the paint has something to grab onto.
  • Option 3: In addition to or in place of the tiny screws that hold the dowels in place, you could cap off the ends of the dowels with a cute wooden ball or some clever object. I plan to do this but haven’t found the right thing yet.
  • Option 4: The brackets don’t jut out very far at all, but if you’re worried about someone bonking their head, sew slipcovers for them with a little padding inside.
  • Option 5: If you have enough wall space, make four or five of these and install them above one another. It could be cute to make a rainbow-like display—red patterned fabric for the top one, orange for the next, then yellow, blue, green, and purple."

Thursday, March 12, 2009

The Blues

"The Blues" card from Hoote + Annie, found via where the lovely things are.

I'm inspired by this print. Not sure why this popped in my head. But wouldn't this be cool painted on the wall in a nursery or play room. It wouldn't be as overwhelming as a rainbow-bright color scheme, nor as kitschy as a wall mural. Just simply blocks of similar color hues. I think the color names are imperative, too. You've got to admit the words are a little more child-friendly than PMS colors. :) But what wonderful way to inspire creativity in a child--blue, there are so many different shades of blue.

Wednesday, March 11, 2009

Baby Shower Story Box

"A Story Box" by Kelly Wilkinson, guest blogging at Design Mom.

Oh my... this idea is too perfect for someone I know (who probably won't be having children for another 5 years or so and hopefully isn't reading--however, if you are, would you let me know so I don't post anymore secrets. thanks, dear!)!

What other baby shower ideas could you come up with around writing, stories, etc?
  • Everyone brings a storybook
  • Favors are mini-journals and pencils
  • Theme--"the next chapter of your life"

"
All this takes is a sturdy wooden box (a cigar box is ideal) covered with some dreamy illustrations, and digging into your shared memories to come up with a few stories that reveal something about the mom-to-be. We all wrote two or three story prompts that Robyn (or her daughter, when she gets old enough) can pull out and use as a starting point for a story. A card inside the box reads “Tell Ada A Story About…” and the handwritten cards take it from there.

The cards we wrote for Robyn included trips that she and her husband took before having kids…famous (and infamous) stories about our parents…and sweet sentiments about what Robyn imagined her son or daughter would be like.


One of the things I love about this project is that it’s a collective expression, and it manages to capture a wide range of feeling and love and history without being too treacley. Perfect for someone like Robyn, who won’t let you linger too long on why she’s a kickass sister, mom and friend."