Friday, December 19, 2008

Megan's IKEA Stool

"Before and After: Megan's IKEA Stool" from Design*Sponge.

Love these stools. I think two sitting side by side in my bathroom would look great. They could be seats or stacking surfaces--both are needed.

"After picking up an inexpensive stool (the bekvam, $19.99) at ikea, megan decided that she wanted to give it a different look. so she stained the wood a darker color, added foam to the top and upholstered it with toile fabric so that her once generic-looking step stool can double as occasional seating for parties or when guests are over."

Thursday, December 11, 2008

Kate's Illuminated Canvas

"Kate's Illuminated Canvas" from Design*Sponge.

"what you’ll need:
1. lightweight canvas fabric or muslin, un-primed
2. stretcher bars or pre-made frame (mine is 16 x 20)
3. 2″ x 2″ wood (enough to make a frame 1″ shorter on both sides than your painting’s dimensions)
4. acrylic paint (i used craft paint that has a nice liquid consistency, rather than more tube acrylics that are more solid)
5. one big and one small paintbrush
6. pencil
7. light bulb and socket set (i used one of those hanging pendant light bulb sets from ikea)
8. heavy duty staple gun
9. tracer light box (this is optional, but helps a lot)
10. computer and printer
11. mitre box and saw
12. hot glue or nails

instructions:
1. plan out the composition and text of your canvas. use a word program to print the text actual size in the font of your choice.
2. tape the printed text on the back of your canvas where you want it to be and trace the letters on the front in pencil. you can also freehand your text or design if you want.

3. stretch the canvas onto your frame. make sure the text sits where you want it to on the frame.
4. carefully paint around your text or image and fill in the rest of the canvas. you do not have to use black, but make sure you do several coats of heavy paint so light won’t shine through. hold canvas up to a light sourced to check for spots that need another coat.
5. measure the 2×2’s and cut them to create a frame for the back. this frame will be roughly 1″ smaller on both sides than your frame so it will be slightly inset on all sides (i.e. for my 16 x 20 frame, i had two pieces that were 12″ long and two pieces that were 19″ long). use hot glue or nails to attach the pieces together. NOTE: the frame should not be a rectangle, it should look more like a boxy “A”, where the bottom piece is attached slightly above the bottom of the two sides. this way you can thread the cord behind that piece, so the frame can lay flat against the wall.
6. take your socket set and staple the cord to the sides of the 2×2 frame so the bulb hangs roughly in the middle. staple the cord to the sides in a few places and let hang down the bottom. use a low wattage bulb so as not to create too much heat behind the fabric. i used 25 watts.

7. when canvas is dry, attach the 2×2 frame with the light to the back of your canvas frame. you can adjust the light cord so that the bulb hangs straight down and does not hit the canvas. i used hot glue, but if you have a larger or heavier canvas you should use nails to attach the frames together."

Tomorrowland Trees

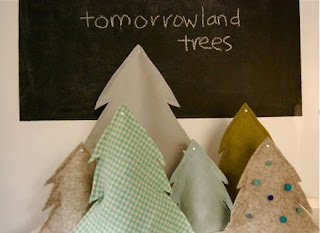
"Tomorrowland trees" from Wise Craft.
"The secret to making them stand up are the styrofoam cones the tree form slips over I found mine at the local Joanns. You could also make make your own cone shape out of cardstock, or anything sturdy.

Tomorrowland Holiday Trees

Dsc_3566

Supplies

Tree Templates download here

*Styrofoam cones of various sizes. I used 3 sizes, small- 6" x 2 7/8", med- 9" x 3 7/8", large- 12" x 3 7/8", and sized my paper template to fit these. Use whatever size you want, Keeping in mind that you may have to enlarge or reduce the pattern accordingly.

Fabric of your choice (you want fabric with a little body- home decorator weight or heavier, wool felt, synthetic felt, canvas, felted sweater, etc.)

matching or contrast thread (I used off-white thread for all of them)

embellishments (optional) I used small white crystals and felted wool beads, your imagination is the limit here. Fabric glue works great to attach these, the right fabric glue is like concrete that way.

Dsc_3585

To Make

1. Make a template of the pattern out of cardstock or heavy paper for easy tracing. As you can see, the tree template is only half a tree, so lay it on a folded piece of paper as indicated to cut a complete tree. Enlargement and reduction sizes are noted.

2. Cut out 2 pieces for each tree.

3. Pin these pieces together, wrong sides together, taking special care to pin at the pointy branches so the edges stay matched up as best they can.

4. Stitch through both layers using a topstitch, 1/2" from the edge, all the way around, but leaving the bottom completely open.

5. Trim a little off the edge all the way around, to neaten up.

Dsc_3583

6. You are ready to embellish. I only did one side, but you could do both if the trees will be seen from both sides.

These definitely look best in groupings, and they are so easy, why not do a forest? Wouldn't they look pretty with some tiny white lights surrounding them?"

How to make a snowstorm

"How to Make a Snowstorm" from CraftStylish.

"1. Simple labels (1-inch circles) and some dental floss is all you need to make a winter wonderland.

2. Attach the dental floss to the adhesive side of a label.

3. Place a second label over the top of the first, sandwiching the dental floss between the two.


4. Randomly space your labels along the length of dental floss to give your finished snowstorm a natural look.


5. Hang finished strands in front of windows using small pieces of masking tape affixed to the tops of the window frames."

Wednesday, December 10, 2008

Tuesday, December 9, 2008

Paper Evergreens

"Paper Evergreens" from Martha Stewart.
"Step 1-For large Christmas trees, use an adjustable circle cutter to make 2-, 3-, 4-, 5-, and 6-inch-diameter circles from green card stock (for small trees, omit the 6-inch circle).

Step 2-Fold each circle in half 4 times with a bone folder (top). While circles are folded, snip off the tip of each piece, forming a very small hole in center.

Step 3-Place smallest circle on the pointed end of a wooden skewer (we used 12-inch skewers), letting the tip poke through the hole in circle. With a hot-glue gun, dab underside of circle, where paper and skewer meet. Hold for 10 seconds to secure.

Step 4-Working 1 at a time from smallest circle to largest, slide remaining circles onto skewer; secure with glue.

Step 5-Insert bottom of skewer into a spool; remove, and cut skewer to desired height (we cut ours to 6, 9, and 10 inches), keeping in mind that only spool should be visible beneath standing tree. Return skewer to spool; secure with glue. Add a dot of glue to top of skewer, and attach a gold bead."

Friday, December 5, 2008

Easy Paper Candy Favors

"Easy Paper Candy Favors" from Zakka Life.

"Suppplies
3" by 5 1/2" paper
double sided tape - scrapbook type that roll on (you could also use glue)
Flip paper upside down. Fold paper to make a small tab (refer to picture). Where yellow lines are, place double sided tape.

Fold in half to make a little pouch like the picture above. Seal the bottom.

Fill with candy. Squeeze sides togeather to seal. The favor should resemble a triangle.

Done!"

Embroidered pillowcases

"A Gift for Mom" from Under Construction.

Love this idea for grandparents, even grandfathers. Hand-embroidered, monogrammed pillowcases with kids' drawing and writing.

Our Birth Day Book

"Our Birth Day Book" from Playful Learning.

This might seem like obvious in this life-caching, memory-keeping world that we live in. But I record it here as a reminder of a wonderful tradition and heirloom that can be flipped through each year, and passed on to later generations.

"This year, we started a new birthday tradition that was a big hit and that we will revisit for a long time to come. We created a Birth Day Book for her, which contains pictures of us as a pregnant couple, positive pictures of her birth and snapshots of her first precious moments with us. She sat spellbound as we relived the story of her birth with loving detail. We followed up the experience by reading the book, On The Day You Were Born, by Debra Frasier."

Thursday, December 4, 2008

Oven mitts

"New Oven Mitts" from A Thousand Words.

Love this style with the bold print and long arm protection. Think it has velcro to attach it to the rod. Might be cute Christmas presents--do you need to put something special in there to protect from heat?

Fabric Memory Game

"Memory Game" from Hallmark Magazine.

Unfortunately my nephew is getting a little old for this--maybe, I could squeeze it in for his birthday! A photoshoot might be in order at Christmas!! But I definitely want to remember it for future toddler gifts.

"Make This Game!
You’ll need:
  • 18 digital images, sized at 2 x 2 inches (if you don’t have photo software, try shrinkpictures.com)
  • 6 sheets ink-jet-printable fabric
  • Scissors
  • 1 yard 36-inch-wide wool felt
  • ½ yard 45-inch-wide printed cotton fabric
  • Acid-free glue stick
  • Sewing machine
  • Zigzag pinking shears
  1. Print out two copies of each picture on photo fabric; cut out the image, leaving a white border around all sides so that you end up with a 3 x 3-inch square.
  2. Cut wool felt into seventy-two 4 x 4-inch squares.
  3. Cut printed cotton fabric into thirty-six 4 x 4-inch squares.
  4. To make a tile, stack the fabric layers as follows: Place the cotton printed side down. Place two layers of wool felt on top of the cotton. Then center the photo fabric, image side up, on the stack. Before you sew, dot a bit of glue between each layer to hold all four pieces together without pinning (a pin might leave a hole in the photo-fabric layer).
  5. Machine-stitch through the tile layers around the outline of the photo. (The bottom layers are a bit larger than the photo fabric, so it’s easy to keep all the layers lined up.)
  6. Trim all the layers of the tile at once with pinking shears, leaving a narrow white border around the image.

MEMORY GAME RIBBON-TIE BAG
You’ll need:
  • Sewing machine
  • Two 10 x 12-inch pieces of cotton calico (for the bag)
  • Scissors
  • Two 10 x 12-inch pieces of contrasting cotton calico (for the lining)
  • 3/4 yard of 1/4-inch-wide ribbon
  • Needle and thread
Finished size: 9 x 11 inches
Seam allowance: 1/2 inch (13 millimeters), unless otherwise noted
  1. With the right sides of the front and back bag pieces together, stitch the long edges of the bag. Stitch the bottom edge of the bag. Trim the corners, press the seams open and turn the bag right-side out.
  2. To make the lining, place the right sides of the front and back lining pieces together and stitch the long edges. Stitch across the bottom of the lining, leaving a 5-inch opening through which you will turn the bag. Trim corners and press the seams open.
  3. With right sides together, place the bag into the lining (the outside of the lining will be facing you). With the top edges even, stitch around the top of the bag through both layers. Pull the outer bag through the opening in the lining. Turn in the edges of the opening in the lining and stitch the opening closed. Stuff the lining inside the bag and press the top edge.
  4. To make the ribbon tie, fold the ribbon in half. At the fold, hand-stitch the ribbon to the outside of the bag at one of the side seams—about 2 inches below the top edge of the bag—being careful not to stitch through the lining. Wrap the ribbon around the bag, and tie in a bow to close."

Wednesday, December 3, 2008

adventcalendar


adventcalendar
Originally uploaded by melmelmel
"Advent Re-vent" from What Knot and her Flickr page.

Someday (ok, probably not this year), I'm going to make a really cute Advent calendar for my family (and maybe my sisters'). Adding this to the collection of inspiration...

Bits of Color quilt

"Bits of Color" from Film in the Fridge.

Not planning to quilt anytime soon, but if I did, or if my mama wanted to quilt for me... this would be the quilt for me. Modern, simple, and beautiful application of this old-fashioned skill.