Friday, November 21, 2008

Holiday stick stars

"The Holiday Crafting begins...with stick stars" from Molly Irwin, inspired by A Foothill Home Companion.

These NEED to adorn my home!! All year long!!

"A trip to the backyard, or better yet, a nature walk, will yield the supplies you need: 5 sticks, approximately the same size. Or multiple reeds (from Molly Irwin)

Lay the sticks in a star pattern.

Hold the star in place with clothespins.

Tie the sticks together (at each intersection of the pentagon within the star) with string, yarn, thread or even floss.

Tie another string at the top of the star if you wish to hang your creation."

Wednesday, November 19, 2008

How to... Family Wall

"How to... Family Wall" from My Sweet Savannah.

Bing, bing, bing, I think I figure out what will go in our bar area!!

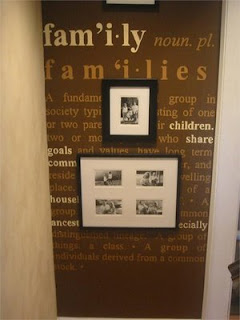
"1) Paint your wall chocolate brown, let dry a day or so. I used canoe brown by Eddie Bauer at Lowes, but any dark brown would do

2) type up what you want your wall to say. If you like the family one I did, go to www.wonderfulgraffiti.com and copy there saying. I used the definition out of the dictionary but tweaked it a bit. Type it up so it all fits on one sheet of 8 1/2" x 11" paper

3) Measure your wall it is going on

4) figure out how much you need to enlarge it at kinkos to fit your wall. They can help you with this, or you can use your calculator. if you need it twice as big, enlarge it 200% and so on. I believe mine was something like 800% bigger.

5) Use the oversized copier at kinkos (they can help you) to enlarge it to your size. it's about $10.00 per sheet

6) Tape transfer paper to your wall. You can get this at craft stores. it's about $4.00 a package and you will need several. I cut out this step by literally "scribbling" with pencil all over the back side of my enlarged copy. It does the same thing and saves you the money on the carbon transfer paper. Kids like to help with this part!

7) Tape your enlarged copy on your wall. make sure it is straight by using a level

8) Once you have it where you want it, use a ballpoint pen to "trace" around each letter, until done. This is the hard part, your hand will hurt! Put enough pressure on so that the pencil will come off on the wall under it.

9) Then just use craft paint to fill in the letters. It doesn't have to be perfect, mine isn't. I used a light brown and a creamy color I think. You can use any color you like that matches your house.

10) and that's it! Good luck!"

Friday, November 14, 2008

Fabric Fridge Frame

"Fabric Fridge Frame," from How About Orange.

These would be so cute on our new refrigerator. We even have leftover scraps from the curtains.

"A used corrugated cardboard box was sitting around here collecting dust, so I decided to chop it up and make something out of it. (More on the chopping at the end of this post.) Voila, a magnetic picture frame.

To make this, cut a piece of corrugated cardboard to the size you want. (Make sure the opening is slightly smaller than the dimensions of the photo you intend to frame.) Cut a piece of cotton batting or thick fleece exactly the same size and glue it to the cardboard, then turn it face down. Next, cut your fabric into a rectangle that allows you enough extra to wrap around to the back of the frame. Trim the outer corners off at 45ยบ and cut slits toward the inner corners. Then wrap the fabric to the back and glue. (I used some gel fabric glue, but it's messy. Next time: glue gun.)

Add a felt backing with either a slit for inserting your photo, or just stick on two separate pieces, one for the pocket and another strip across the top to hide the fabric's ugly raw edges. When you glue the felt on, apply the glue just outside of the area where the photo will sit. Make sure the outer edges are stuck down, too, and add some magnets to hold it on your fridge.

The reason I was desperate to chop up a cardboard box was so I could try out my new toy: this Skil Power Cutter. It's cordless, self-sharpening, and makes slicing through cardboard and foam core a piece of cake. If you have a job that requires precision and perfectly straight lines, this is not your tool, but for cutting things down to size quickly, it's perfect. Love it."

Thursday, November 13, 2008

Letters

"Weekend Project Challenge #1, Letters" from SpragueLab
Which doorway will our last name fit best on? What an easy breezy decorating scheme! Modern and cool, too

"For my letters, I chose big press-board letters - this was the first time I’d seen big letters that weren’t in some crappy font like Comic Sans or Curlz, but a nice classic, graphic serif. I picked them up from A.C. Moore, for a couple bucks each, plus a can of white spray-paint.

Two coats later, plus some removable adhesive (pause while I grovel in the general direction of 3M) they look SO cool against the white trim of the door that leads from the front room to the kitchen."

Tuesday, November 11, 2008

Double Desk Bookcase

"DIY: Double Desk Bookcase" from Apartment Therapy: Los Angeles
Not sure if I could get Rob to agree to this, but it sure is an inspiring idea. Maybe even to save for kids' work areas later.

You can download a pdf with instructions from the site.

Map Lamp

"Map Lamp How To" from Chez Larsson found via One Pretty Thing.

I love this--matches my ideal modern, but sophisticated decorating style. I even love the white initials sitting next to it. Maybe for our stair nook??

"Ok, to make a map lamp this is what you need: A lamp shade. For this small one I used a white lamp shade I had already. The one in Wille's room used to be covered in striped fabric but I tore that off and removed the glue residue with glue remover. Stinky! You'll want something similar to a cutting board, permanent spray adhesive, an exacto knife an of course your map of choice. Martin chose Stockholm for this one while the one in Wille's room is Barcelona.

083

This lamp shade is great because it has a ribbon edge and that will help you get a neat finish. The one in Wille's room didn't have that so there I had to be extra careful to cut it straight and glue it on straight too. Measure between the edges...

089

...and cut a long strip that covers the shade and then some. For Wille's I had to paste two together overlapping slightly. Then measure by holding the map strip around the map, make a mark and cut.

Spray permanent spray adhesive onto the back of the map (I do this outdoors) and affix to the shade smoothing out any air bubbles with hands.

095

Here's what the shade looks like unlit...

094

...and here lit. If you don't want the double map effect that you're going to get because bought tourist and road maps almost always have print on both sides you can probably color copy the map onto white paper first and glue that to the shade instead. I kind of like this effect tough."

Wednesday, November 5, 2008

DIY: Ottoman


"Make Yourself an Ottoman"
found at Blueprint's blog via CasaSugar.

If only I could find those exact pillows... they would totally match our new bedroom!
  1. Choose two cushions. You could use regular sofa cushions, but for a more streamlined look, purchase box-edged floor cushions.
  2. Measure the cushions.
  3. Have a piece of wood cut to the size of your cushion at your local lumber store.
  4. Choose a paint color for the ottoman's wood base.Then paint the wood and let dry.
  5. Choose your casters. You'll need four.
  6. Drill four holes in the wood — all approximately 2 inches in from each corner — and screw the casters into the holes.
  7. Flip over so the casters are on the floor, and stack both cushions on top of the wood platform.
  8. For best results, use a nonslippery fabric on the cushions, such as canvas. Silkier fabrics tend to slip, which isn't conducive to ottoman relaxation!